13 Mar 2016

Evaluation Question 2

How does your media product represent particular social groups

Below is an emaze showing the representations in our media project and how we have represented them, enjoy!


The next post will be evaluation question 3Powered by emaze

11 Mar 2016

Evaluation Question 1

In what way does your media product use, develop or challenge forms and conventions of real media products?

In our media product we follow the conventions of a real thriller opening. Just like a real media product we have a studio and production company ident.
In an opening of a real media product hey would have titles showing who collaborated in producing the film. An establishing shot would be used in the opening of a film to give the audience an idea of the setting. We have used a different type of shot to resemble our establishing shot. 


We use an establishing which then tilts down into a first person came which then moves towards the location of where the product is set. Then once in the building we then use pans to give the viewer an idea of where the product is set.


 A lot of thrillers are also set in an isolated are to start building suspense and so we decided to go for a garage as it fits with the conventions of a media product.


In real thriller products they are usually set at night so we used low key lighting and in post-production we added a day to night filter to give it all a darker feel. We used a lot of ideas from Fight Club and here is an example of low key lighting from Fight Club.


In the soundtrack of our product we use stingers to build tension and suspense which is a key feature in thrillers.
Here is our soundtrack with in our film.

   
Example of Soundtrack The Other Side from Gavin Hood on Vimeo.

In our media product we have challenged some conventions by having the protagonist as the antagonist. When thinking initial ideas we thought of fight club. In fight club the producers have over 90 minutes to confuse the audience with the idea that the protagonist is the same person as the antagonist but we only had two minutes so we had to think of many ideas just in case one of them didn't work.


In a lot of thrillers the protagonist will usually have a backstory to show where they came from and it would show where they are in life and and events that will lead up to the events of the film. In our film we went straight in with no back story to have the audience even more confused and want to find out more about our protagonist. 

In our film we have developed the idea that our protagonist is also the antagonist. We started by using a different actor to be the antagonist and we used that in our rough cut and the group thought it worked well but we came to think that our audience would become confused by the idea of it so we decided to use one actor and it worked as well if not better as at the end of the opening our protagonist faces off with the antagonist, himself

The next post will be Evaluation Question 2

4 Mar 2016

Final Cut

So here it. The final cut. As a group we are proud with our final product as we have worked hard to get this to a high standard.
Thank you for following this journey. I hope you have enjoyed it. It's been hard but I have also enjoyed it.
Here it is, enjoy!


1 Mar 2016

Feedback, Evaluation of Feedback & Making Improvements

So recently we were able to show our rough cut to the rest of the class and we were given feedback on what went well and what we could improve on. Below is a video of what the rest of the class thought.


Here is a list of some of the improvements that were raised:
  1. We need real idents
  2. We need an establishing shot
  3. Our pans need to all be the same speed
  4. We need to use better footstep sound effects
  5. Our protagonist needs to be prompt with answering the phone
In one of my previous posts you would have seen my idents and so here they are, actual idents. Not that low quality image that was in our rough cut.


We also needed an establishing shot as we have been studying them. So we decided to go from an establishing shot into a first person shot which we believe works well in this instance.


We needed to make sure all of our pans were the same speed so each member of the group filmed 3 pans so we had a high chance that all of them were the same speed and we are happy with the outcome


We had to make sure our protagonist was more prominent in answering the phone so we had him walk straight up to the phone and answer it. We didn't have him walk behind the phone which caused us to change a few things to the ending of the opening.


We had to change the ending of the film when we changed how he answed the phone as it caused problems with the mirror. We couldn't see the reflection and when we could the mirror picked up the camera or the camera operator.

We took all the feedback well and listened to it well and changed everything that we were asked to, to the best of our ability. As a group we are happy with the changes and are happy with the outcome.


The next post will be the final cut of our film The Other Side.

27 Feb 2016

Rough Cut

So here it is, our rough cut. I hope you guys enjoy what you see as we worked hard to produce this, enjoy!


Hope you all enjoyed it as we are proud of what we produced.

The next post will be the feedback we get from the rough cut and how we made improvements.

25 Feb 2016

Title & Ident Construction

So for our media production we first needed to open with our studio and production team's idents just like a professional media production would. Earlier on in the course, I did some research on what media studios idents could potentially represent so when we came to create ours we would have to create a meaning with the idents.


Our studio name is Vintage Studios and here is a still of what the ident looks like.

Our production team name is Depth Productions and here is a still of what the ident looks like. You may think that it looks and that is because the ident moves almost like water which links back to the idea of depth (ocean,water)

Me and another member of the team sat down and looked through many templates in after effects to find ones that we liked and thought would fit with our team and what we wish to create.

The next post will be our the rough cut of our media production.

23 Feb 2016

Editing

Now that our shots have been filmed we now need to edit what we have to produce our media product. The software we have been using is Final Cut Pro. Getting to grips with Final Cut was difficult but we finally got our heads around it and was able to proficiently edit our shots using many of the tools we were provided with by Final Cut.
While we were editing we took screen shots to show our progression and how what we did progressed through the film.


First when editing we added our production team logo to show the viewer who produced the film. We then applied our first clip and added a day to night filter to give the clip a more darker feel. We then used our first transition which was a wipe and after that had our first title showing our actors names. We then took out all sound in our clips to get rid of the background sound as hearing this would ruin our product.


After we had finished putting all the clips where wanted them we then had to crop some clips short so the length of the product didn't go well over the 2 minute requirement. We decided to add our film name at the end of the 2 minute opening as it would leave our audience wondering while they watch. We then added a sound track that fitted the feel of the film we wanted to make and without the soundtrack the opening would seem nowhere near as good. We added sound effects for the phone ringing in our film and sound effects for the footsteps of our actor walking. 

I feel my contribution to editing was to find out what certain tools do within final cut and apply them to our product. I also assisted the other members of my group in editing as I have a greater knowledge than them and I watched over them and gave my opinion with the choices they made.

The next post will be on the construction of the products idents.

5 Feb 2016

Shooting On Location

Over the last 2 weeks my team and I have been filming our media product and while we were either setting up or filming the main task we were also taking photos of what we were doing. We did this to we know what each member did and to see how we worked as a team and to see how successful we were, enjoy!


Before we began filming we set the equipment up in the positions and angles we needed. The camera had to set up on the tripod in order for our recordings to look level and professional. The tripod has a center spirit level in the side for us to find the balance and correct vertical position for the camera to sit at. After the camera was set up correctly, we then set up the sound recording kit using the boom to capture test samples of footsteps.


During one scene in our film, these props are used by an actor. So before shooting this clip we had to set the desk, telephone and mirror up in the positions we needed to get the shots we needed and to keep with the theme of film it is. 


Each member of the team had a go at each role. We all knew what we wanted to produce so we all had the same idea in our heads.
The recording sessions which took place were all successful as shots recorded from each shoot has been used in the rough cut.
My own contribution to the shooting session is that I directed a lot of what happened and was the camera operator several times.

The next blog post will be the editing process of our media product.

21 Jan 2016

Shooting Schedule

In this post I am going to be showing my group shooting schedule. You are probably wondering what is a shooting schedule? A shooting schedule is simply what day and what time you are going to be filming and who's going to be there. It important because you want to make sure your actors and your crew are there at the same time. So you can reduce cost and time wasted on the film. For example, you are making a stranded film. You want your character to grow a beard, he spends a few weeks growing the beard then you film all the scenes with the beard. Then you finally film the scenes without the beard. So then you save money by not paying the cast on the few weeks he needed to grow the beard and the film locations. If not filming in chronological order for example, Cast Away.

19 Jan 2016

Actor Release Form (One For Each Actor)


Now me and my group have started to record scenes for our thriller movie, we have to make sure we have full consent from the actors and their parents if they are under 18.

The actors we have arranged to play the role of Kyle Hawkins and Wade are both male and are under the age of 18, so we have created an actor release from for them to sign so we as a production team can avoid any trouble caused by actors not wanting to be on camera.

The actor release form is double sided, the back section of the form has some terms and conditions we encourage the actors to read before signing, here is an image of our terms and conditions:


Here are the signed forms from our actors stating that they are comfortable being filmed by us and that they have read the terms and conditions:


Alex Ellis aka Kyle Hawkins

Josh Hill aka Wade

The next post will be the shooting schedule.

18 Jan 2016

Risk Assessment

When filming on location, the crew and actors are going to face potential threats that could cause them injuries. So in our group, we created a chart stating the different risks we could face when filming. The chart has a series of risks that we could face when filming and puts them into a ranking order of likely hood of happening and how we can combat them from happening in the first place.


The next post will be the actor release forms.

10 Jan 2016

Animatic


Before filming the actual media product we must first create an animatic using images from the storyboard to re-enact what we want the product to look like.


After it was watched by the studio we were given the go ahead but we were also given some constructive feedback.
1. Make sure that when the continuous pan moves at the same speed
2. When following the head movement make sure we snap with head movements so it works just how people look

When given these pieces of feedback we took them well and will keep them in mid when filming the rest of our product.

The next blog post will be risk assessments. 

7 Jan 2016

Animatic Research.

Now we have finished our storyboard we still cannot yet start filming our media project. We need to produce an animatic. An animatic is a rough version of our film using only images from our storyboard with sound effects, dialogue and the camera movements we wish to use. Before we produce our own storyboard we must first do some research on existing animatics.

Below is an animatic fro the film Shaun of the Dead. 


The animatic contains a draing for each movement/shot of the camera, it contains dialouge and audio effects just like the real film would
Now I will post the real media product to go with it to see how accurate the animatic is compared to actual film.


Now comparing the animatic to the finished product I see one error between planning and completed product. The animatic doesn't take into account the zooms and pedestal shots that were put into the final film. Other than that the animatic is almost perfect at reflecting what the producers wanted to create. When we create our animatic we must make sure that every camera movement we wish to use is in the final film.  

The next blog post will be our animatic, enjoy!

29 Dec 2015

Storyboard

Before we can start filming the planned film we have to create a storyboard to show exactly what will happen in each shot and annotations of camera movements. 
Below is the storyboard the film we will create "The Other Side".


So there was our storyboard. When we produce our animatic we will then be able to see if we need to re-write our storyboard so we get the most accurate to the film we wish to create.

My next post will be research on animatics.

13 Dec 2015

Storyboard Research

Before a studio start recording a film they must make sure they know what exactly happens in the story line so the studio produce what is known as a storyboard which is a sequence of images showing what will be in the shot with detail on editing and other camera work jotted down around the storyboard itself.
Below is a storyboard for the opening titles of the classic comedy "Shaun of the Dead".
If you have watched the film you should be able to recognize what happens in this scene as it is very accurate to the film itself.


To see how accurate the storyboard is I have posted the same scene from the film below so we can compare.


The storyboard is the story line and base line in which the film reflects off. The storyboard needs to be good to create a good film. The storyboard contains the detail that needs to be put into the film.

The next post will be on our storyboard.

12 Dec 2015

Prop Research & Formal Prop List

In visual media products there are things called props, items which are used on set. These props can come in all sorts of shapes and sizes going from chewing gum to a laptop.
Below is a media product which uses one of the props that's going to be in our film... A phone, enjoy!


This scene uses a modern phone as it is set in the modern day the phone belongs to the character present and it works in the scene as its a modern hotel building. If the phone was old it wouldn't fit well within the scene.

In our product we will be using very few props.

One of those props is a telephone.


The phone is going to be an old fashioned telephone like the one above. The old fashioned phone will give off a creepy effect because a modern mobile phone doesn't give off the same creepy effect. The old phone gives an impression that the location has been abandoned for a long time. The protagonist will be dressed in KFC uniform which is associated with working class where as an old fashioned telephone is associated with high class people. This shows that the protagonist is out of his comfort zone as it isn't something he'd be used to working with. The phone colour will be brown because the film is a thriller we don't want any bright colours that could change the tone of the film to being less serious. The colour brown will be effective as it has connotations to death and decay for example, rust is brown and dead leaves are brown; this ties into the mood of the film as it adds to the other elements of mise-en-scene that are dismal. The phone resembles the character which in the film we will be creating this phones resembles the protagonist, Uptight as it is posh and fancy but decayed as it is old.
A person with an iPhone can be seen following the crowd and mainstream but also sophisticated as the product is all about the look and performs well. Now an Android user could be seen as quite pedantic as they are very much about what their phone can do or that they are quite relaxed and chilled as their phone can do many things or they are not fortunate as they have a phone that can be fairly cheap compared to apple products.

If we were to use a mobile phone like this then it wouldn't fit the the setting we wish to use. It would stand out and look out of place which would ruin the whole feel of the film.

Another prop will be a mirror as it is essential to the plot of the film.


The mirror will be a long mirror because this way when the camera is pointing towards the mirror we will be able to get all of the characters in and their outfits. This will enable us to show off all the features that we want. We can also play around with the lighting on the mirror to give it more of a creepy effect. The mirror will be dirty and dusty because this way it will look much creepier and give the location a more abandoned look. It will also add to the rough look of the character.


If we were to use this mirror then again it would ruin the feel of the setting. We need it to look dark and dirty and if we used a fancy mirror it would ruin the whole look.

Another prop is a lamp as it brings atmosphere to the setting

The tall lamp will be dusty because we need the location to look like it has been abandoned for a long time. The brightness of the bulb in the lamp will be low because we need low key lighting in the room because we want the lighting to give off an intense and creepy look. Also we don't want the features of the characters to be shown too brightly because we want the low key lighting to give an impression that the character has a dark side.

If we were to use this lamp it would completely ruin the whole set. It wouldn't work at all and would change the whole feel the film and may even become a slightly comical which would wreck our film.


The next post will be research on storyboards.

10 Dec 2015

Costume Research & Formal Costume Plot

For this new thriller film their going to be very few outfits used when filming. The main outfit that is going to be used is a normal KFC workers outfit for both the protagonist and the antagonist because the plot twist in this film is that they are both the same person like the Fight Club characters; Jack and Tyler Durden. So other outfits won’t be used in the film but they will be some minor changes to the characters outfit.
First we are going to be talking about is the first character in this film called Kyle Hawking. Kyle Hawking is going to be protagonist in the film. The audience is going to be watching him, while he tries to remember what happened to him and who is the strange overseer watching his every move and communicating to him through an old fashion phone. Kyle is going to portray the total opposite to Wade meaning he is going to be scruffy, timid, dependent and humble. His clothes will mainly represent his personality, social groups, wealth and class.
The antagonist for this film is going to be a character called Wade. Wade is going to be the one watching Kyle acting as the overseer while only communicating to Kyle through the old fashioned telephone that I talked about early. Wade is going to be the main one in control through this small film by controlling Kyle as well as the one who kidnapped Kyle. Wade personality is going to be the opposite of Kyle by having him more demanding, assertive and definitely more spontaneous than the timid Kyle. His clothes will mainly represent his personality, social groups, wealth and class.
Examples of famous movies with characters who have a split personality


    As I have said before there won’t be many outfits used when filming but we will include subtle changes between Kyle and Wade so the audience still remember there the same person but are different sides of the same coin. But we don’t want to change to much so some audience members think that Wade is an evil co-worker.

First change between the two character is that Kyle is going to have his shirt tucked into his trouser this can show many things for example.
·    

 This shows his personality trait of being timid and reserved because if he didn’t it will most likely draw attention from the customers at KFC rather than blending in.
·     It also shows he is confident and is more of a follower because it’s the company policy to tuck the shirt in.
·     The colour of his red shirt can represent madness because technically he is mad by having this split personality called Wade.
Wade shirt is going to be much different for example.
·     The colour of his red shirt can also represent more things about the character such as danger; rebellious as well as courage this symbolism represents Wade personality perfectly.
·     KFC Shirt is untucked meaning that he is breaking company policy so showing he is rebellious as well as courageous.
·     The shirt will be loosely buttoned showing more of how rebellious the character is.
Because they are the same person they will both be wearing the same trousers.


The shoes are going to be a smart pair of black shoes like for example a pair of oxfords below


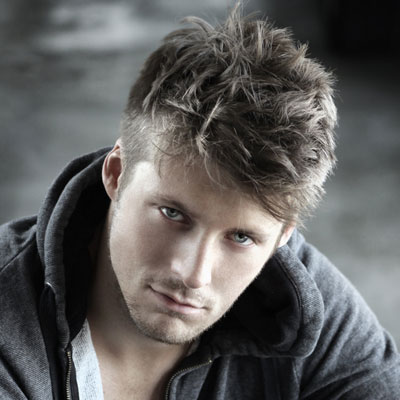
One other change between the two characters is their hair cut. First Wade’s haircut will look a bit like the haircut on the left showing that he is carefree like the split personality in Fight Club, while Kyle’s hair cut on the right shows he likes to look respectful at work.

Now below is a formal prop schedule which will let actors know what to wear and when. Thankfully we only have one outfit that the actors will need to wear.
The next post will be prop research and props.